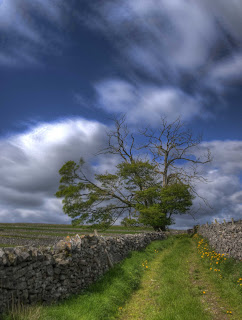
Thoughts on HDR
Right here goes, this is what I do but still some work and some don’t. Don’t use PShop; for this you have Photomatix and version pro 3.1 is the best I’ve found. The only problem I have is that adjustments don’t happen in real time so you can spend a fair bit of time undoing. Ctrl Z doesn’t work there’s a little arrow at the bottom for undoing.
1. Set the camera capture to RAW
2. Set White balance to 5500K, this isn’t important you can rectify any colour casts in the RAW converter later but you don’t want the white balance to change
3. Set focus to manual
4. Set exposure to manual
5. I don’t set to Brkt.
6. Set aperture to F18 or so. There seems little point in having all that range and half the job out of focus.
7. Set camera metering to spot.
8. Set ISO to around 100, if later your longest exposure is much over 15” then I increase the ISO. It’s a trade off you are trying to avoid noise; it’s a nightmare to get rid of.
9. Put camera on the tripod
10. Connect cable release or use the self timer
11. I set mirror pre lift to 2”, on long exposures it doesn’t really matter.
12. Make sure image stabilization is off.
13. Point your camera at the darkest bit and make a note of the speed for a correct exposure, or remember it if you can
14. Point your camera at the brightest bit and set the correct speed.
15. Compose your shot, focus and fire away increasing the exposure time by 1ev until you get to the time you wrote down. This can be in 2ev steps if you want.
16. Job done go home.
Now for the workflow:
1. Load images into PShop and into the RAW converter
2. Select all
3. Adjust WB if necessary
4. Set black slider to 0 leave everything else at default
5. Click done
6. Open images in Photomatix HDR generator. Sometimes it says it doesn’t like the file format, just click on OK for each image. It likes them fine really; it’s just trying to wind you up.
7. Click OK, then I select align by image details (this takes longer but works fine) select reduce noise and chromatic aberrations the Ghosting reduce option appears to do beggar all but select it if you want then click OK and go and make a cup of tea or cook a five course meal.
8. When the image is done, it will look awful, panic not, click Tone mapping and if it still looks pretty awful set sliders to default it’s at the bottom. Photomatix saves your previous settings, very useful if you are going to stitch multiple images Then come back up set strength to max, saturation to around 65 luminosity to as bright as you want and smoothing to high or very high
9. You should have something reasonable without messing with anything else, half the sliders appear to have little effect, or maybe it’s my eyes.
10. Save it and load back into Photosop editor
11. Go to layers pallet select levels, Click the left hand slider hold down the Alt key and slide till you see bits of yellow.
12. Go to the white end and do likewise.
13. I tend not to use the gamma slider but click OK.
14. Select brightness/ contrast and adjust if you think fit click OK.
15. Select Hue/Saturation I like bright saturated colours but suit yourself and click OK.
16. The Photo of the half dead tree had a bit more work, I press Ctrl+Shift+Alt+E ,a pet octopus is handy here, (stamp visible). Make sure it’s at the top of the layers stack, set blend mode to overlay and adjust opacity this gives very fine control over the end result
17. Select layers flatten save it and the jobs a good un.
18. I leave things at this stage I don’t sharpen or interpolate image size till I know what it’s going to be used for. (If anything in my case)
Hope that’s all clear as Mud, Feel free to criticise me, curse me, or whatever. There’s rarely a right and a wrong way for anything and I’m still at the beginning and learning.
Thanks to the man who gave me so much encouragement Dan Norcott
See Stephen cotton wool clouds, it was blowing a gale this day so Brkt. may be a good idea.

No comments:
Post a Comment