This is using Photoshop Elements. Have been blogging for three weeks and Flickring for about a week longer and trying to add a digital signature to my images. It's easy when you know how, it just took me ages! The only problem I've not solved is how to add the finished artwork to batches of images. I suspect some third party software may be required as Process Multiple Images doesn't seem to do the trick. Here goes:
Open elements Editor go to file and select New..Blank File
Make sure Transparent is selected, I didn't bother altering the image dimensions, and click OK
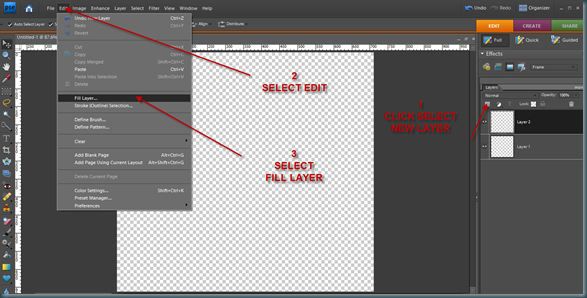
In the layers pallet select new layer, go to Edit and click Fill Layer.
Select fill with White, unless you want your text to be in white in which case pick another colour. This is not an important step it just allows you to see your writing more clearly.
Next select Text and choose a font from the options bar. Don't panic over this you can alter it later. In fact the whole job is editable, even when finished, so once you have the basics you can fiddle away indefinitely. I'm going to use something heavy as it will show up better. Type your text I chose ajw as these are my initials. You can borrow them if you wish.
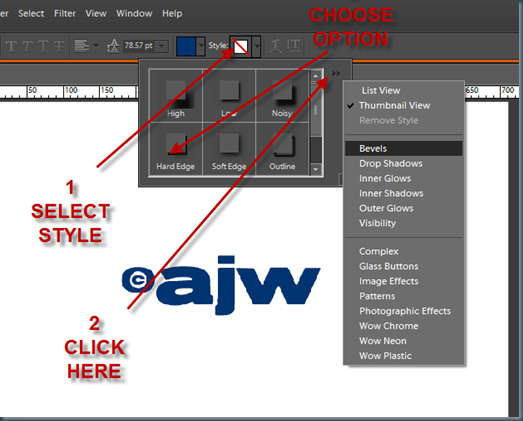
Now I am not the brightest lamp in the street but should you wish to add © then to insert it press alt+0169 using the number key pad. This took me days to find, kept me awake at nights, well you get the drift. Eventually I opened Word, selected Symbol and found the magic formula. You can edit this to (alt + pretty much any thing you like). I haven't because I'd forget what I'd called it. The job is done at this stage apart from a little cheering up, you can add shadows, bevels, skew the job, change colour and swap your font. If like me you need the practice then here we go.
When you have selected the bevel that suits you, double click the little fx and the Style settings box opens. In here you can really have fun, and make your work unique, I choose this word advisedly, unique is not to be confused with excellent! When you have finished select OK. A word of warning, if you are wanting to produce other logos or work to match the style you have created make a note of these settings or some time in the future you're going to be using some inappropriate language. The last adjustment is skew and free transform. Go to the select arrow, click it twice and a box will appear round your work. To adjust size click a corner. To distort vertically/horizontally click and drag a middle box, to skew hold down ctrl and pull any box, take your time with the latter, this job seems to use serious memory, just wait a second or so before dragging.
If you want free transform, select text and press ctrl+T, quite amazing what happens when you drag corners!
To change the font reselect text, put your cusor at the front of the artwork, highlight it and pick another.
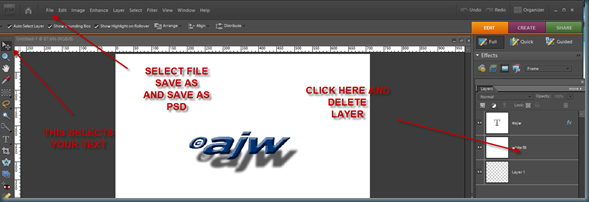
Before saving, right click white layer and delete, I named this layer, if you didn't it will say Layer2, select File-Save As- and save as Photoshop PSD, you can then change/edit it anytime you open it.
When you want to add it to a picture, open both in Editor select your image by double clicking, drag your artwork into it resize and the jobs done.
THAT'S IT HAVE FUN.


No comments:
Post a Comment